Floral deer decals…

So I wanted something on my nails but couldn’t be bothered to paint any nail art, so I grabbed some water decals. This one is from a big sheet of animal decals from BornPrettyStore which I’ve previously reviewed here. It’s a pretty handy set as it includes 120 ‘nails’ and includes several kinds of animals in all different colours so there’s something for every occasion.

Floral Deer Water Decals close up

Anyway, I went with an accent nail and tried colour match it’s base as best as I could, then added some dried flowers for a little extra.

Floral Deer Water Decals nail art

Born Pretty Store: Chameleon Gel…

So I have a UV lamp but haven’t used many UV Gel products so I was interested to try out the ‘Chameleon Sequins Gel BP-08‘ that BornPrettyStore sent to me to review. There’s only 3g of gel in the little tub which doesn’t look much at first but actually there’s plenty.

BPS Chameleon Sequins Gel Collage
I started off with a black base then applied two coats of the gel, curing in between. For application I used a small flat brush as I felt it would pick up the Chameleon sequins better than a pointed brush. Even though it’s described as ‘sequins’, I’d probably call it a chameleon flakie.

Black Base.JPG
Chameleon Sequins Gel BP-08 40795

Those colours though, right?!

It really is beautiful and it was worth doing two coats of gel as I think it helps add a bit of depth. I sealed in all in with a no wipe UV gel top coat.

As pretty as it is alone, I thought it made a fitting base for some basic galaxy decoration. What do yous think?

Galaxy Chameleon Gel Bp-08.jpg

If you would like to order this Gel or anything else from BornPrettyStore feel free to use my code AZYW10 at the check out to receive 10% off all your full priced items.

AZYW10

BornPrettyStore: Fish BP-151

So I’ve not written a review in ages! Today I’m showing you a fish themed stamping plate from BornPrettyStore. Have a little look at the following pictures and let’s play ‘One of these things is not like the others’.

BPS Fish Stamping Plate BP151
BPS Fish Stamping Plate BP151 Plate

Did you get it right? Why on earth has a unicorn been included, bizarre. There is actually a fish called a Unicorn Tang but it certainly doesn’t look like that. (I suppose you could argue that jellyfish aren’t fish but at least it’s related in the name and live in the sea.)

Anyway, the fish images are pretty usable and picked up crisply. They lend themselves well to reverse stamping if that’s your bag but if it’s not don’t worry as they can also be used just as effectively for as stamp-and-go images.

BP 151 Fish Image Pick Up

However, if you have quite long nails I think you’d struggle to cover them with just one image. I think you’d have to pick up the image twice and try to do some sort of over-lap. I have naturally long nails without have long growth (if that makes sense) and the images were close to being too small to cover mine. Also, as beautiful as the central goldfish is I didn’t have much practical use for it as it’s massive!

Enough nit-picking, who’s ready for some nail art example;

Fish Stamping Plate BP151.jpg

Matte Top Coat Fish Plate BP151.jpg

Jellyfish Fish Plate BP151.jpg

Fish Print FishPlate BP151

So which was your favourite? If you fancy trying out some fish-related designs the plate is currently on sale for only $1.59 and free shipping! Should you happen to add anything else to your basket, use my code AZYW10 at the checkout to receive 10% off all your full priced items.
AZYW10

BornPrettyStore: Halloween Stamping Plate BP-L057

So just in time for Halloween this rectangle stamping plate has lots of spooky (and not so spooky) images to use. It was sent to me by BornPrettyStore and even though you wouldn’t receive it in time for Halloween this year it is half price at the moment.

Halloween Square Plate BP-L057.jpg

Fortunately it isn’t a one trick pony, it’s not all witches and pumpkins. I feel it has a nice balance of themed vs normal images. The obvious example of ‘usable’ images would be the skulls as they’re not soley related to Halloween. (I also include the spider webs, cats and bats within this category.)

Skulls were the first image I chose to stamp. I used my BornPrettyStore stamping polish and clear mallow stamping head and as you can see they came out pretty crisp! The plate didn’t need much prepping, I think this was actually only the second or third scrape before it picked up this strongly. Not bad huh?

BP-L057  Square Plate Silver Skulls.jpg

I also used a second skull image to demonstrate that it’s easy enough to isolate a single element and use that. This one is a little patchy but that could be due to a few reasons; not enough polish, not prepped enough, clumsy scraping. To be honest though I think it kind of adds to the whole effect! (I love the fact he’s already missing a few teeth.)

BP-L057 Square Plate Skull.JPG

And ta-da, the design as a whole! Not so Halloweeny right?

BP-L057 Skull Stamping Design

So now let’s actually get on to what the plate was designed for – Halloween! I chose another ‘stamp and go’ image, this time some skeleton cats. Some of them picked up better than others, again maybe the plate needed more prepping or I needed to use more polish.

BP-L057 Skeleton Cats

I thought it was quite a playful image (I can’t have anything too spooky on my nails as I work with children) so felt that a neon ombre would be a twist on tradition too. What do you think?

BP-L057 Neon Cats Design.JPG

Over the next week I’ll be using this plate again to bring you some more Halloween nails! If you order anything from BornPrettyStore, use my code ‘AZYW10’ at the checkout to save yourself 10% off all full priced items and remember free shipping. This plate is already half price, so go for it!

AZYW10

BornPrettyStore: Peacock Powder…

So today I’m going to show you some ‘Peacock Holo Powder‘ in option LG-04 (sent to me by BornPrettyStore). But if you follow me on Instagram this’ll be no surprise as you’ve already had a sneak peak at it!

Peacock Powder Packaging

The powder comes in a screw-cap tub within a little bag, and at first I was shocked by how little there was – I genuinely thought it hadn’t been filled properly. But! Upon looking again at the description it does state 0.2g so actually that’s about right.

You will need a no-wipe gel top coat to be able to use this powder as it won’t ‘stick’ to normal polish. I gave mine top coat 25 seconds curing time leaving it just very slightly tacky but safe enough to touch without leaving marks. It is also suggested that the powder be applied on top of black polish so that’s what I did.

Black Base Coat

It’s beautifully smooth and a little goes a long way, I can see why 0.2g is a perfectly acceptable amount now. I can also understand why it’s full description is ‘Peacock Holographic Chameleon Mirror Chrome Powder‘, what a mouthful right BUT LOOK AT THOSE COLOURS! It displays all of those qualities;

Black Base Peacock Powder
Black Base Peacock Powder Shade shift
I decided to test it on a lighter colour and it still works perfectly well! It gives it a slightly different under tone. (To reiterate just make sure you’re applying the powder to a no-wipe gel polish or regular polish that’s been gel top coated.) Unlike other chrome powders I’ve tried, this one is very easy to control. It’s not as messy in it’s application meaning it doesn’t end up sticking to your skin or cuticles – no clean up, no latex barrier bonus!

Different Base Colour
Black VS Pink Base Coat

I chose to top coat the powder with my usual, Seche Vite, which has a terrible habit of melting metalics, foils and chromes but it did an amazing job at staying strong. If anything top coating the powder made it sparkle and holo even more, you can’t deny that that shine ^ is awesome.

For one last test I chose to use a blue base. I think you could have a lot of fun trailing this powder on loads of different colours, and I don’t think any of them would come out dissapointing. Has anyone else used this powder, what were your results?

Blue Base Peacock Powder.jpg

I really could have sat and looked at my nails all day. The ‘Peacock Powder‘ is amazing and it looks exactly as it’s described. At first the 0.2g may seem disappointing but a little goes a long way, it applies well and it’s at a very reasonable price.

LOOK AT THOSE COLOURS! (But ignore the fluff, whoops…)

Gridwork Nail Art Peacock Powder.jpg

If you’d like to try this product or anything else from BornPrettyStore, use my code AZYW10 to receive 10% off any full priced items in your order.

AZYW10

BornPrettyStore: Cute Animal Plate…

So I’ve not written a review in a long long time, apologies! Genuinely, does everyone still find my reviews interesting or at least inspirational?

I received this ‘Cute Animal stamping plate‘ from BornPrettyStore and there are some seriously cute patterns to use. A lot of them are ‘stamp and go’ meaning there’s no need to faff about with reverse stamping and the likes so it’s perfect for pros and beginners alike.

animal stamping plate.png
Being a bit of a dinosaur fan, it was an easy call as to which image I was going to use first. I created a very simple background, using scrunched up tinfoil to dab polish on to the green base and started to stamp with the dinosaur image. It only took two practice pick-ups for the plate to warm-up (it’s kind of like breaking in new shoes), meaning what you see below is the third: how crisp is that!

Dino Stamping Collage

Granted, I was using Konad stamping polish meaning it’s highly pigmented but still pretty impressive especially the dinos tails, spikes and horns.

Animal Dinosaur Stamping Plate 39486.png

The next image I chose to use on the plate was one that I could use create a stamping decal with. The rabbits seemed pretty fun, and I like the addition of the broccoli and carrots – cute! Some of the finer lines on the rabbits faces were a little trickier to pick up but nothing too noticeable once it’s on the nail.

Bunny Stamping Design.png

Pretty cute huh? This is another example of a BornPrettyStore plate that’s suitable for a variety of themes/holidays. For example rabbits for easter, penguins for winter, hedgehogs for autumn and bats for Halloween.

The last design I created was again a quick stamp and go one, featuring some giraffes. Now on the plate the giraffes are actually part of a pattern, but I chose to discard the surplus animals leaving one on the stamping head at a time. Just because an image is etched in a certain way doesn’t mean you need to use it as such!

animal giraffe stamping plate.png

If you feel like trying this plate out for yourself, remember to use my code ‘AZYW10’ to receive 10% off any full priced items in your order. The plate is currently (31/7) half price and BornPrettyStore does free shipping so why not go for it!

AZYW10

BornPrettyStore: Origami Stamping Plate…

So I am seriously in love with this plate! (Sent to me by BornPrettyStore) Please tell me that you guys are too? It has such a variety of cute images and they’re so darn versatile – you could honestly use it for any mood or season. It has it all; flowers, hearts, animals, patterns. Because of the variety of images and endless designs that could be created by using all the different stamping techniques too, I spent a few days creating four completely different looks with it.

Origami Stamping Plate in Sleeve 39127.png

But first up lets have a look at the plate itself. How satisfyingly shiny are new plates once you peel off the blue film! It kills me to have to do this as I’m a bit of a freak, I still have the protective film on my phone screen and one of my watches…

Origami Stamping Plate 39127.png

I’m really digging bees at the moment so the origami image of one was irresistible. I decided to do some ‘reverse stamping’ with it and pair it with an origami tulip. I used one of the patterns from the clouds as a subtle background.

Stamped Origami Bee 39127.png

As you can see the plate performed incredibly well – the images are very crisp and even without a stamping polish, the background pattern worked too. A cute and simple design to start off with!

Origami Bee and Tulip 39127.png

Even though the plate is full of origami designs, I chose to avoid them for my next mani. I picked out the little strings of hearts and dots and rather sickeningly paired them with red. It’s no where near valentines day which is maybe why it made me feel so sick but it was to demonstrate that you can use the images for any occasion. Again credit where credit’s due the images are crisp and bold. This time they are stamped with black Konad stamping polish.

String of Hearts 39127.png

The next image I chose to focus on was the origami star. If you look at the plate, it’s very close to the sting ray and frog so I wonder if it’s intended to be a starfish but I chose to use is an actual star. It would work either way! I kept it very simple, an easy ‘stamp and go’ design. Sometimes I feel, especially with stamping, people show you magical designs that aren’t in everyone’s skill range (or time frame). This is do-able for everyone! Linking back to the seasonality, this would be a suitable design for christmas or the new year?

Origami Star 39127.png

For my final design from the plate I went back to reverse stamping, by this I mean stamping the image, ‘colouring’ it in whilst still on the stamping head, then transferring it on to my nails. Roses aren’t really my thing but I thought I could make them cool by placing them on an ombre and using a rough background pattern. I couldn’t get over how crisp the rose picked up, those lines are on point! (That’s what cools kids say yeah?)

Origami Rose 39127.png

Origami Rose Crisp Image 39127.png

So out of all four designs, which one turned out to be your favourite? Surprisingly for me, my favourite turned out to be the rose design closely followed by the bee! If you would like to try the plate out, BornPrettyStore offer free shipping and the plate is currently on sale – hooray! If you add anything to your basket that’s full priced, use my code ‘AZYW10’ at the checkout to receive 10% off.

AZYW10

BornPrettyStore: Watermelon Brush Stand…

So how bloody cute is this little watermelon wedge! It’s for holding your nail art tools and it certainly stops them from rolling right off the table. (Anyone else have ‘alive’ dotting tools that like to spontaneously roll away?) Also if you’re painting both your hands, the stand gives the tools enough height off the table to ensure that you don’t smudge your wet nails on the table when trying to pick them up. So handy, but also just a cute thing to have on your mani table!

CeramicToolHolderWatermelon.png

As it’s ceramic, it would also function quite nicely as a chopstick holder. The stands are inexpensive and come in a variety of shapes (how cute is the deer? And the owl. And the whale actually) so would certainly make a lovely gift too.

CuteWatermelonCeramicBrushStand

I decided to do some quick nail art, which unfortunately turned out horrendous. (Why that yellow base?!) But rather hilariously it looks like some sort of evil, smirking face. Anyone else see it?

Watermelon CeramicBrushStand

BornPrettyStore: Silver Metal Frame

So today I’m reviewing some ‘Silver Metal Frames‘ sent to me by BornPrettyStore. I chose them because I’ve seen some super cool ways they’ve been used by Japanese nail artists whom I follow on Instagram. Unfortunately those guys are nail art wizards and I’ve came no where close to achieving their standards, but I’ve done my best to make them look as best as I can!

They’re literally just little hoops of metal, very light-weight and beautifully beveled to sit better on your nails. They come in a lot of different sizes, shapes and also you get the option of either gold or silver. As you can see I went for the Silver Circle in 6mm.

SilverMetalFrameCollage.png

I first applied my base coat, and whilst still wet, settled the little frame on to my nail. (As I was going to be applying UV gel top coat over it later, I didn’t think it would need any proper fixing to start with). I then filled the frame with little chunks of silver. I think it almost makes it look like a silver geode or precious rock. I’m no expert in geology terminology, any help with what I’m trying to describe here would be appreciated!

MetalFrameCollage

I then encased the whole thing in UV gel polish top coat. As you can see the polish affected neither the metal frame nor the silver chunks – hooray!

MetalFrameCloseUp.png

SilverMetalFrameChromeDesign.png

So what do you think of using the frame like this? I think without it, the silver chunks would have looked a bit random and there’s no way they would look so neatly arranged.

For the second look, I painted my left hand. I know, I bet yous thought I didn’t have one, I hope you didn’t faint from shock. I just couldn’t bear to take off the first design as I really liked how it turned out. This time instead of filling the frame up I chose to use it as a decoration in it’s own right.

SealifeDesignMetalFrame.png

I went for a bright, summery beach look that required zero painting skills. It’s just a shame I didn’t included another frame as it’s looking a little lonesome. But hopefully you can see what I was trying for!

So which design do you prefer? For me, it has to be the first look even though the second is a lot more seasonally appropriate. The frames are currently on sale (16/05) at $1.29 for 10 which is a great price.

Have you got metal frames hiding in your nail art supplies already? Has anyone else seen the Japanese nail artist wizards that I’m talking about? So inspirational.

If you would like to purchase anything from BornPrettyStore, use my code ‘AZYW10’ at the checkout and you’ll receive 10% off all your full priced items – yaaay to savings!

AZYW10

BornPrettyStore: Big Sheet Animal Water Decals…

So this ‘Big Sheet of Animal Water Decals‘ has some super cute designs, there’s something for everyone – pandas, rabbits, cats, dogs and deer! It was sent to me by BornPrettyStore to be put through it’s paces and before I show you how some of them look on my nails, I just want to break down what great value this sheet is.

Big Sheet Water Decal Animal Sheet.JPG

You get 12 designs, each with 10 fingers worth, which equates to 120 water decals for the measly price of $2.87/$1.59 sale price (correct 29/4). This means each decal is costing you $0.02, amazing right? So the first design I’m going to show you is a good example of how to make your money stretch even further by using just one decal per mani as an ‘accent nail’.

I chose to use a decal from the deer set with a white background as this allowed me to paint the rest of my nails the same colour. Then it was just a case of cutting out the decal I wanted and applying it as normal. (If you’re unsure or need a refresher about this, keep scrolling as I’ve included a sort of step by step next) Ta-da! Simple, quick mani for $0.02.

Simple Deer Water Decal Use

Big Sheet Water Decal Deer Set

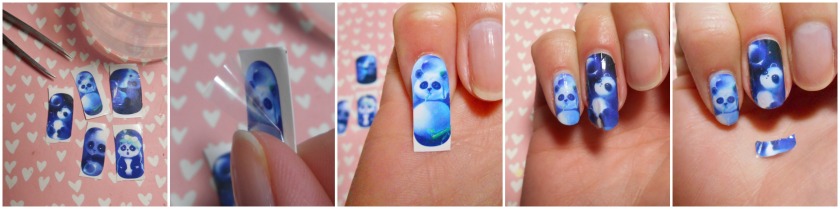
So I might have go a bit carried away about how cheap it is, so lets do the re-cap on how to actually use and apply this product properly. With them being water decals you will need; a shallow dish of water, tweezers, scissors, nail file and a tissue. I’ve chosen this super cute panda set to demonstrate the application steps.

Panda Set.JPG

The first step is to cut out the decals you wish to use. With this big sheet you need to be quite accurate with your cuts as there are no borders between each design – take it slow and steady.
Make sure you remove the clear, protective layer covering the decals and trim them to size before you submerge them in the water.
Leave them there for around 15 seconds, at this point the decal should be able to slide off the backing paper with ease and use your tweezers to remove them from the water. Place them on your nail in the correct position, gently dab with a tissue to remove excess water.
Then remove the excess that may be hanging off your nail with a file.
Ta-da!

Application Collage

The length of the water decals is quite generous and easily fitted all my nails. Personally my nails are all different lengths, so sometimes I trimmed off the top part of the decal to help the design sit better meaning I wasn’t having to file off parts that I liked.

Now came the biggest test – the top coat. Unfortunately sometimes decals melt, like the design squashes and the colours bleed and things that that. However, these guys actually look better with a top coat! They didn’t melt and it actually helped to iron out some of the wrinkles. (I used Seche Vite)

No Top Coat vs Top Coat.jpg

You may have noticed that I added some glitter on to the little water orbs the pandas are fascinated by. This totally isn’t necessary but helps to demonstrate how easy it is to customize the decals!

Big Sheet Animal Water Decals Panda.jpg

Aren’t they cute! They sailed through the top coat challenge, but how about the well known ‘3 hours in a  pool, teaching children to swim’ challenge? Amazing. Very minimal chipping, and even though the top coat may be helping this I’ve previously had the whole water decal float off my nail in to the pool. (Anyone else had that kind of problem?) But not these guys, look at the results!

Minimal Chipping.JPG

I’m so very impressed with how they did over-all, and I still can’t get over the price. I had another idea about creating a pretty, but very economical gift with them. Why not pair up a set of decals, with a matching polish for base colour, and an inexpensive but cute nail file? (Make it way nicer than the one I threw in for example…) So lets add it up, shall we say $1 for the file, $4 for the polish, $0.23 for the sheet of decals and maybe $1 for the pillow giftbox – that’s only $6.23/£4.81! How about that? A gift for under a fiver, amazing! What’s nice about these decals is that they don’t look poor quality or feel cheap once applied, so there’s no way someone would know.

Inexpensive Gift Idea

Do you ever have one of those items where you just have too many ideas for it and get a little obsessed with using it in different ways? Well I’m afraid that’s what happened with this sheet of decals. I really didn’t intend to do three different designs but after cutting out the dog set purely for the example gift set, the little dachshund was crying out to me to be used. I went for some super colourful, dry brush nails and used him as a pinky accent, cute no? And it only cost me $0.02 😉

Multi-coloured Dachshund.JPG

I can’t wait to use the little rabbits they’re so cute, but the cat set…. Anyone fancy them? I’m unfortunately not a cat person. Hope you enjoyed the review and that I gave you some ideas to think about!

If you’d like to order the whole sheet for yourself or friends head on over to BornPrettyStore. Anything in your basket that’s full price will recieve a 10% discount when you use the code ‘AZYW10’ at checkout.

AZYW10